Pecan Pie Bars – Buttery, Nutty, Crowd-Pleasing Treats
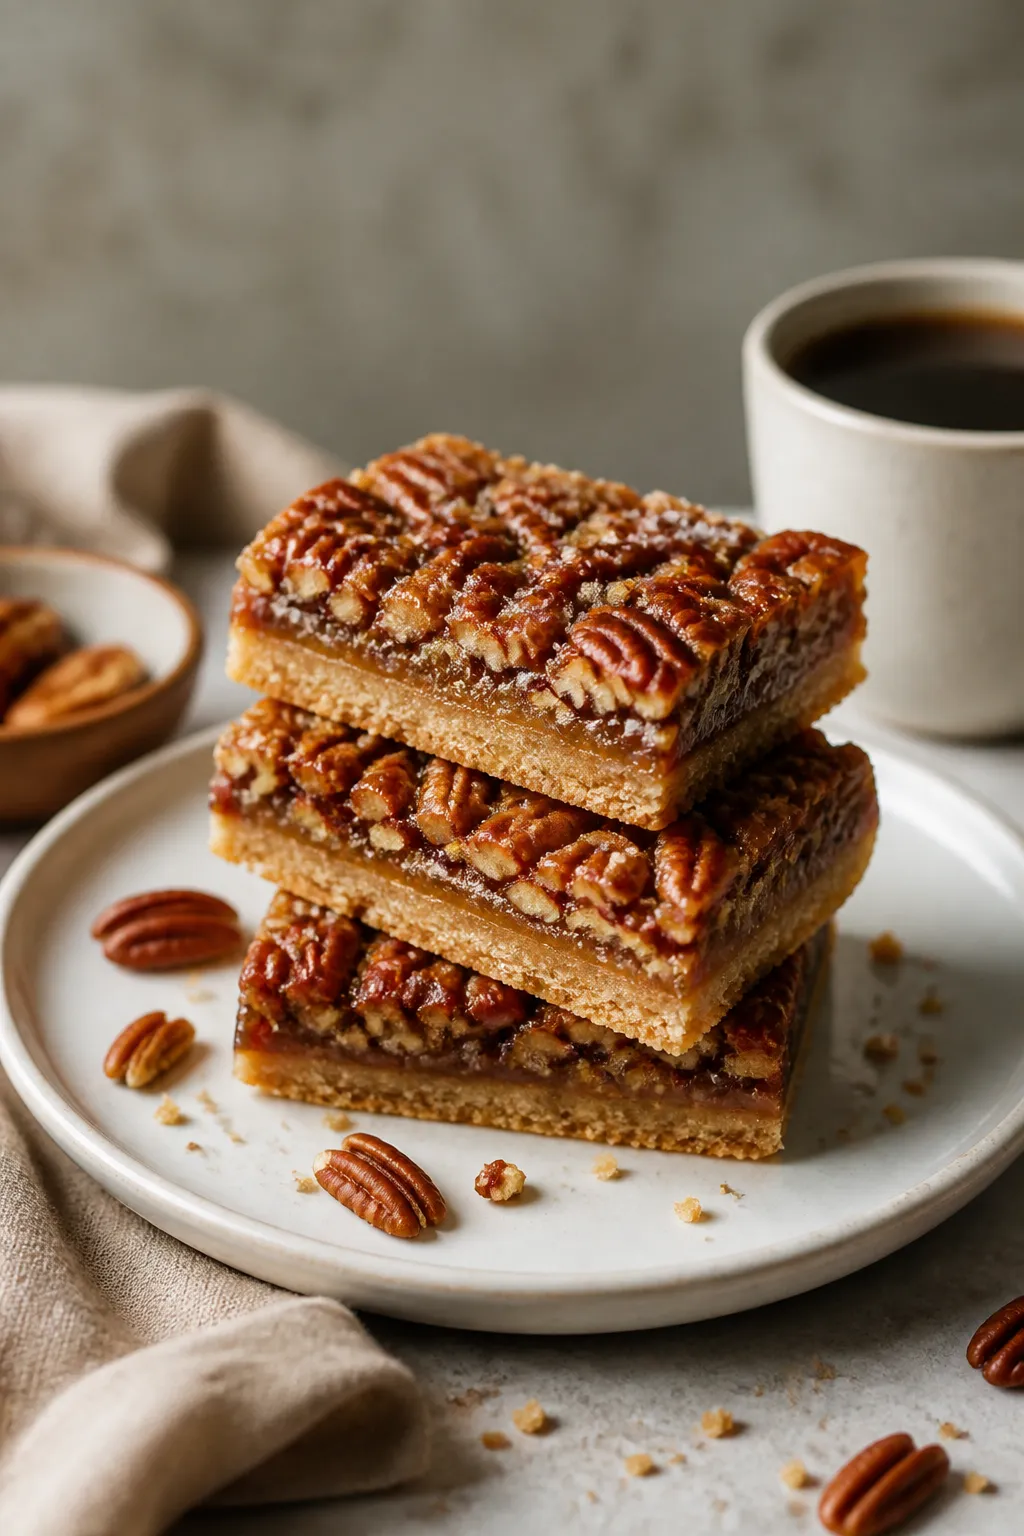
If pecan pie is your holiday favorite, these pecan pie bars are about to be your year-round staple. They’ve got the same gooey, caramel-like filling and crunchy toasted pecans, all on top of a buttery shortbread crust. No pie dish, no fuss, just simple squares that slice clean and travel well.
They’re rich without being cloying, and the texture is spot on: crisp base, soft center, and a toasty crunch on top. Whether you’re heading to a potluck or baking for your own kitchen, this recipe is a keeper.

Ingredients
Method
- Prep the pan and oven: Heat the oven to 350°F (175°C). Line a 9x13-inch baking pan with parchment, leaving overhang on two sides for easy lifting. Lightly grease the parchment.
- Toast the pecans: Spread pecans on a sheet pan and toast for 6–8 minutes, until fragrant. Cool slightly, then roughly chop. This step keeps the nuts crunchy.
- Make the shortbread crust: In a bowl, mix 1 cup (2 sticks) softened unsalted butter, 1/2 cup granulated sugar, 1/2 teaspoon salt, and 2 cups all-purpose flour until a crumbly dough forms. Press it evenly into the lined pan.
- Par-bake the crust: Bake the crust for 15–18 minutes, until the edges just start to turn golden. This prevents a soggy base.
- Mix the filling: In a medium saucepan over low heat, melt 4 tablespoons unsalted butter. Whisk in 1 cup brown sugar and 3/4 cup maple syrup or light corn syrup until smooth and glossy. Remove from heat and let cool 3–4 minutes.
- Add eggs and flavorings: Whisk 3 large eggs in a separate bowl. Slowly whisk the warm syrup mixture into the eggs, a little at a time, so they don’t scramble. Stir in 1 tablespoon vanilla extract, 1/2 teaspoon salt, and optional 1 tablespoon bourbon or a pinch of cinnamon.
- Combine with pecans: Stir in 2 1/2 cups chopped toasted pecans until evenly coated.
- Assemble and bake: Pour the filling over the warm crust and spread into an even layer. Bake 22–28 minutes, until the center is set and the top looks glossy and slightly puffed. The middle should jiggle slightly but not slosh.
- Cool completely: Place the pan on a rack and cool at least 2 hours. For the cleanest slices, chill 30–60 minutes after cooling. Lift out using parchment and cut into bars.
- Finish and serve: If you like, sprinkle with a pinch of flaky sea salt. Serve at room temperature.
What Makes This Recipe So Good

- Shortbread crust that stays crisp: A simple mix of butter, flour, sugar, and salt creates a sturdy, melt-in-your-mouth base that doesn’t go soggy under the filling.
- Gooey but sliceable filling: The combination of brown sugar, maple syrup or corn syrup, and eggs sets into a perfect soft chew.
- Deep pecan flavor: Lightly toasting the pecans before baking brings out their natural sweetness and keeps them crunchy.
- No pie drama: No rolling out dough, no worrying about cracked crusts. Press, pour, bake, slice.
- Great for a crowd: One pan yields neat bars that pack and freeze well.
Shopping List
- Unsalted butter (for crust and a little in the filling)
- All-purpose flour
- Granulated sugar (for the crust)
- Brown sugar (light or dark for the filling; dark gives deeper flavor)
- Maple syrup or light corn syrup (either works; maple adds extra flavor)
- Large eggs
- Vanilla extract
- Salt
- Pecans (halves or roughly chopped)
- Optional add-ins: a splash of bourbon, a pinch of cinnamon, flaky sea salt for finishing
- Nonstick spray or parchment (for lining the pan)
Instructions

- Prep the pan and oven: Heat the oven to 350°F (175°C).
Line a 9×13-inch baking pan with parchment, leaving overhang on two sides for easy lifting. Lightly grease the parchment.
- Toast the pecans: Spread pecans on a sheet pan and toast for 6–8 minutes, until fragrant. Cool slightly, then roughly chop.
This step keeps the nuts crunchy.
- Make the shortbread crust: In a bowl, mix 1 cup (2 sticks) softened unsalted butter, 1/2 cup granulated sugar, 1/2 teaspoon salt, and 2 cups all-purpose flour until a crumbly dough forms. Press it evenly into the lined pan.
- Par-bake the crust: Bake the crust for 15–18 minutes, until the edges just start to turn golden. This prevents a soggy base.
- Mix the filling: In a medium saucepan over low heat, melt 4 tablespoons unsalted butter.
Whisk in 1 cup brown sugar and 3/4 cup maple syrup or light corn syrup until smooth and glossy. Remove from heat and let cool 3–4 minutes.
- Add eggs and flavorings: Whisk 3 large eggs in a separate bowl. Slowly whisk the warm syrup mixture into the eggs, a little at a time, so they don’t scramble.
Stir in 1 tablespoon vanilla extract, 1/2 teaspoon salt, and optional 1 tablespoon bourbon or a pinch of cinnamon.
- Combine with pecans: Stir in 2 1/2 cups chopped toasted pecans until evenly coated.
- Assemble and bake: Pour the filling over the warm crust and spread into an even layer. Bake 22–28 minutes, until the center is set and the top looks glossy and slightly puffed. The middle should jiggle slightly but not slosh.
- Cool completely: Place the pan on a rack and cool at least 2 hours.
For the cleanest slices, chill 30–60 minutes after cooling. Lift out using parchment and cut into bars.
- Finish and serve: If you like, sprinkle with a pinch of flaky sea salt. Serve at room temperature.
How to Store
- Room temperature: Keep bars in an airtight container for up to 3 days.
Separate layers with parchment to prevent sticking.
- Refrigerator: Store up to 1 week. Let bars sit at room temperature for 20 minutes before serving for best texture.
- Freezer: Wrap bars individually and freeze for up to 2 months. Thaw overnight in the fridge or at room temperature for 1–2 hours.
Why This is Good for You
- Pecans bring nutrients: They offer healthy fats, fiber, and minerals like magnesium and zinc.
- Portion control built in: Bars make it easy to serve smaller pieces when you want a treat without overdoing it.
- Steady energy: The mix of fats and protein from nuts helps balance the sweetness for a more satisfying dessert.
These are still a dessert, of course, but choosing real butter, maple syrup, and plenty of nuts makes each bite count.
Common Mistakes to Avoid
- Skipping the toast: Untoasted pecans taste flat and can soften in the filling.
Toast them for better flavor and crunch.
- Not par-baking the crust: A raw crust leads to soggy, greasy bottoms. Give it that head start.
- Overbaking: Too long in the oven turns the filling hard and cakey. Pull when the center is just set with a slight jiggle.
- Adding eggs to hot syrup: If the syrup is piping hot, you’ll scramble the eggs.
Let it cool a few minutes and whisk slowly.
- Cutting too soon: Warm bars won’t slice cleanly. Cool fully, then chill briefly for sharp edges.
Alternatives
- No corn syrup: Use pure maple syrup or a mix of maple and honey. The flavor will be a bit more complex and less sticky-sweet.
- Gluten-free: Swap the flour for a 1:1 gluten-free baking blend.
Add 1–2 tablespoons cornstarch if the dough seems too soft.
- Dairy-free: Use a plant-based butter with a higher fat content. Avoid spreads with lots of water.
- Different nuts: Try half pecans, half walnuts, or add chopped toasted almonds for added crunch.
- Flavor twists: Stir in orange zest, a dash of espresso powder, or a spoonful of bourbon for depth.
- Smaller batch: Halve the recipe and bake in an 8×8-inch pan. Start checking 5 minutes earlier.
FAQ
Can I make these pecan pie bars ahead of time?
Yes.
They actually slice better the next day. Bake, cool completely, cover tightly, and store at room temperature overnight, or chill for up to a week.
Do I have to use corn syrup?
No. Maple syrup works well and adds great flavor.
The bars may be slightly softer, but they’ll still set nicely.
Why did my filling leak under the crust?
Usually the crust wasn’t pressed firmly into the pan or had gaps along the edges. Make sure the crust is even, well-packed, and par-baked before adding the filling.
How do I know when the bars are done?
Look for a glossy top with slight puffing and a center that jiggles gently when you nudge the pan. If it sloshes, it needs more time.
If it’s rigid, it may be overbaked.
Can I use pecan halves instead of chopped?
Yes, but chop at least some of them. A mix of halves and chopped pieces gives better coverage and makes slicing easier.
How do I get clean slices?
Chill the bars for 30–60 minutes, then use a long, sharp knife. Wipe the blade between cuts.
Lift the whole slab out with parchment for easier slicing.
Can I reduce the sugar?
You can cut the brown sugar by about 1/4 cup without major texture changes. Any more and the filling may set softer and taste less balanced.
What’s the best way to reheat them?
They’re great at room temp, but if you want them warm, heat in a 300°F oven for 5–7 minutes. Avoid the microwave, which can make the crust soft.
Wrapping Up
Pecan pie bars give you all the best parts of pecan pie without the hassle: a crisp, buttery crust, a rich, gooey center, and a toasty nut topping that stays crunchy.
The method is simple, the ingredients are pantry-friendly, and the results are consistent. Bake a batch, stash a few in the freezer, and you’ll always have a crowd-pleasing dessert ready to share.
Printable Recipe Card
Want just the essential recipe details without scrolling through the article? Get our printable recipe card with just the ingredients and instructions.
About the Author

Brandon D
Blogger/Fitness & Wellness Coach
I create quick, healthy, family-friendly recipes that make dinner simple, delicious, and stress-free.