Red Velvet Cheesecake Brownies – Rich, Velvety, and Swirled to Perfection
Red velvet cheesecake brownies are the kind of treat that makes people stop mid-bite and ask for the recipe. They’re fudgy, gently cocoa-forward, and topped with a creamy cheesecake swirl that looks as good as it tastes. The color is striking, the texture is indulgent, and the flavor sits right between brownie and cake with a tangy lift.
This is a crowd-pleaser that feels special but doesn’t demand bakery-level skills. If you can stir and swirl, you can make these.

Ingredients
Method
- Prep the pan and oven: Heat the oven to 350°F (175°C). Line an 8-inch square pan with parchment paper, leaving an overhang on two sides for easy lifting. Lightly grease the parchment and sides.
- Mix the wet ingredients for brownies: In a medium bowl, whisk melted butter, oil, and sugar until glossy, about 30 seconds. Whisk in eggs, vanilla, red food coloring, and vinegar until smooth.
- Add the dry ingredients: In another bowl, whisk flour, cocoa powder, baking powder, and salt. Fold into the wet mixture with a spatula just until combined. Do not overmix.
- Reserve a little batter: Scoop out about 1/3 cup of the red batter and set aside for swirling later.
- Make the cheesecake layer: In a small bowl, beat the cream cheese with sugar, egg yolk, vanilla, and a pinch of salt until completely smooth and creamy. If you see lumps, keep whisking; room-temperature cream cheese is key.
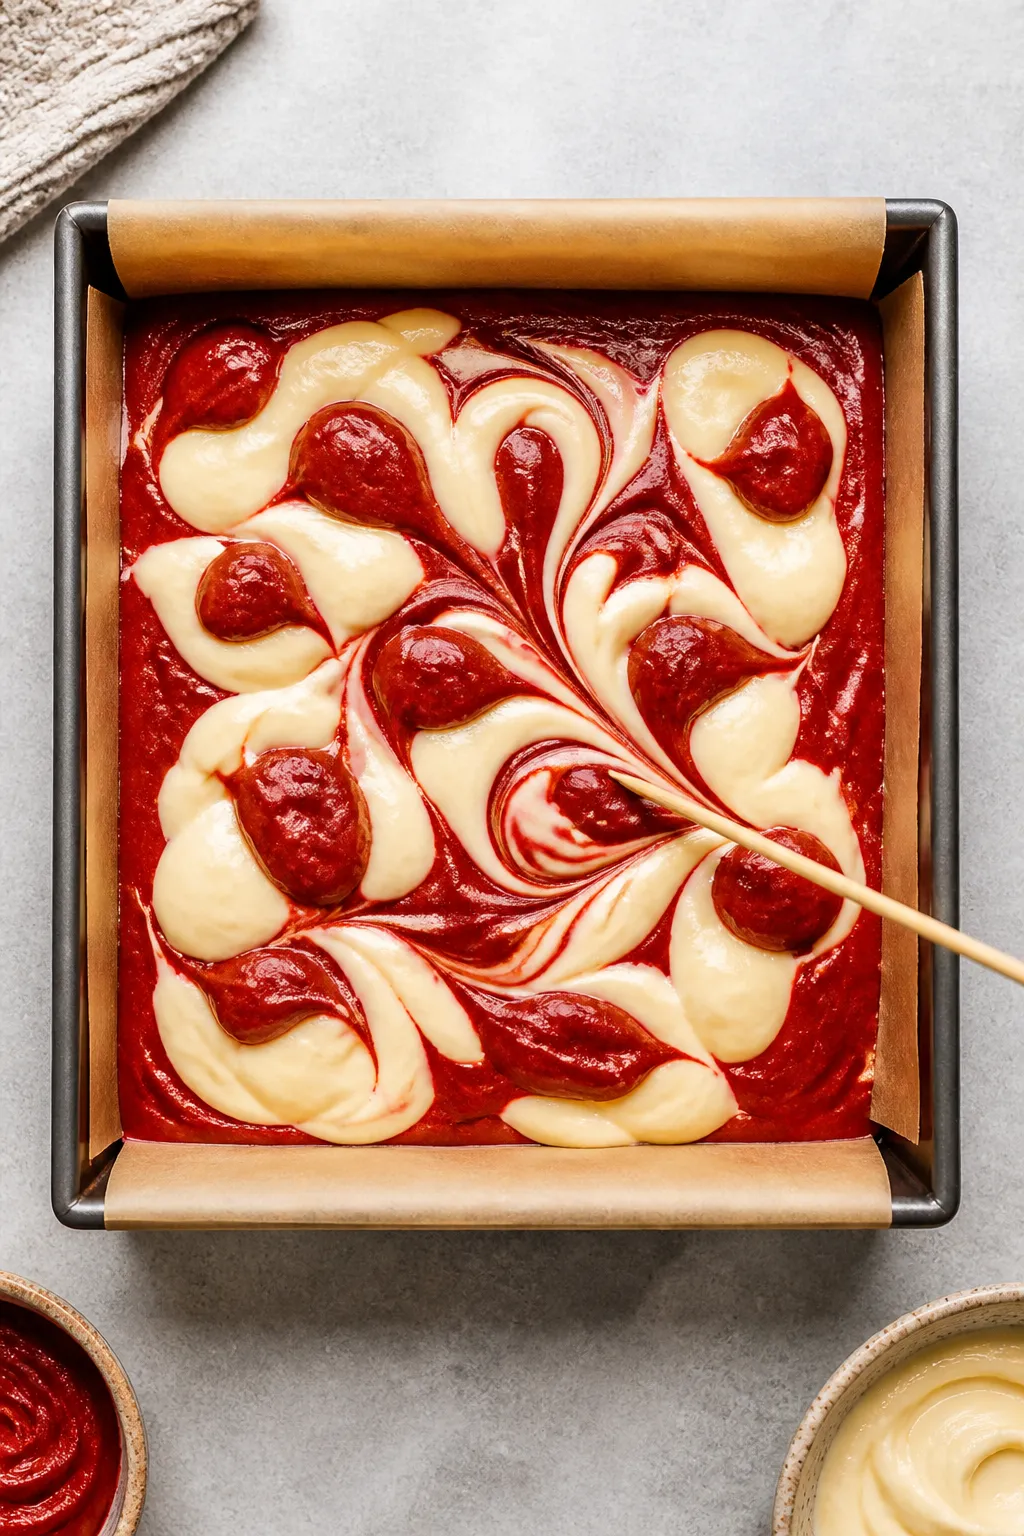
- Assemble the layers: Spread the remaining red batter in the pan in an even layer. Dollop spoonfuls of the cheesecake mixture all over the top. Add small spoonfuls of the reserved red batter between the cheesecake dollops.
- Swirl: Use a thin knife or skewer to gently swirl the batters together. Aim for S-shaped curves and avoid overmixing so you keep distinct ribbons.
- Bake: Bake for 28–34 minutes. The edges should be set, the center slightly jiggly, and a toothpick inserted about 2 inches from the edge should come out with a few moist crumbs. For cleaner cuts, lean closer to done; for fudgier brownies, pull them earlier.
- Cool completely: Let the pan cool on a rack until room temperature, then chill for at least 1 hour before slicing. Cooling helps the cheesecake set and gives neater squares.
- Slice and serve: Lift using the parchment and cut with a warm, clean knife. Wipe the blade between cuts for tidy edges.
What Makes This Recipe So Good

- Balanced flavor: A hint of cocoa and vanilla keeps the red velvet base rich but not overly sweet, while the cheesecake swirl adds tang and creaminess.
- Beautiful presentation: The marbled top looks bakery-made, no fancy tools needed.
- Moist, fudgy texture: Melted butter and a touch of oil help keep the brownies soft with shiny tops.
- No mixer required: A whisk and a spatula do the job for both layers.
- Flexible bake time: You can bake them slightly under for extra fudgy squares or a little longer for cleaner slices.
What You’ll Need
- For the Red Velvet Brownie Base:
- 1/2 cup (115 g) unsalted butter, melted and slightly cooled
- 2 tablespoons neutral oil (canola or vegetable)
- 1 cup (200 g) granulated sugar
- 2 large eggs, room temperature
- 1 teaspoon vanilla extract
- 1 tablespoon red food coloring (liquid or gel; adjust to preference)
- 2 teaspoons white vinegar or apple cider vinegar
- 3/4 cup (95 g) all-purpose flour, spooned and leveled
- 2 tablespoons unsweetened cocoa powder (natural, not Dutch-process)
- 1/4 teaspoon baking powder
- 1/4 teaspoon fine salt
- For the Cheesecake Swirl:
- 8 oz (226 g) cream cheese, softened
- 1/4 cup (50 g) granulated sugar
- 1 large egg yolk
- 1/2 teaspoon vanilla extract
- Pinch of salt
- To Finish:
- Cooking spray or butter for the pan
- Parchment paper for easy removal
How to Make It
- Prep the pan and oven: Heat the oven to 350°F (175°C). Line an 8-inch square pan with parchment paper, leaving an overhang on two sides for easy lifting.
Lightly grease the parchment and sides.
- Mix the wet ingredients for brownies: In a medium bowl, whisk melted butter, oil, and sugar until glossy, about 30 seconds. Whisk in eggs, vanilla, red food coloring, and vinegar until smooth.
- Add the dry ingredients: In another bowl, whisk flour, cocoa powder, baking powder, and salt. Fold into the wet mixture with a spatula just until combined.
Do not overmix.
- Reserve a little batter: Scoop out about 1/3 cup of the red batter and set aside for swirling later.
- Make the cheesecake layer: In a small bowl, beat the cream cheese with sugar, egg yolk, vanilla, and a pinch of salt until completely smooth and creamy. If you see lumps, keep whisking; room-temperature cream cheese is key.
- Assemble the layers: Spread the remaining red batter in the pan in an even layer. Dollop spoonfuls of the cheesecake mixture all over the top.
Add small spoonfuls of the reserved red batter between the cheesecake dollops.
- Swirl: Use a thin knife or skewer to gently swirl the batters together. Aim for S-shaped curves and avoid overmixing so you keep distinct ribbons.
- Bake: Bake for 28–34 minutes. The edges should be set, the center slightly jiggly, and a toothpick inserted about 2 inches from the edge should come out with a few moist crumbs.
For cleaner cuts, lean closer to done; for fudgier brownies, pull them earlier.
- Cool completely: Let the pan cool on a rack until room temperature, then chill for at least 1 hour before slicing. Cooling helps the cheesecake set and gives neater squares.
- Slice and serve: Lift using the parchment and cut with a warm, clean knife. Wipe the blade between cuts for tidy edges.
Storage Instructions
- Refrigerate: Store in an airtight container in the fridge for 4–5 days. The cheesecake layer stays creamy and the brownie stays moist.
- Freeze: Wrap bars individually in plastic, then place in a freezer bag for up to 2 months.
Thaw in the fridge overnight.
- Room temperature: Because of the cheesecake layer, keep out for no more than 2 hours when serving.

Why This is Good for You
- Built-in portion control: These cut into small, satisfying squares, making it easier to enjoy a treat without overdoing it.
- Real ingredients: Butter, eggs, and cream cheese offer richness and structure without artificial stabilizers.
- Enjoyment matters: A balanced dessert can support a sustainable approach to eating. Savoring a square can curb the urge to over-snack later.
What Not to Do
- Don’t use cold cream cheese: It will clump and resist swirling, leading to a lumpy top and uneven texture.
- Don’t overmix the batter: Overmixing develops gluten and makes brownies cakey instead of fudgy.
- Don’t skip the vinegar: It reacts with cocoa and helps create that classic red velvet tang and color.
- Don’t overbake: Dry edges and a rubbery cheesecake layer are signs you went too far. Pull them while the center still has a slight wobble.
- Don’t cut while warm: The swirl will smear and the centers may collapse.
Cooling is your friend.
Recipe Variations
- Chocolate-chunk swirl: Fold 1/2 cup mini chocolate chips into the red batter for melty bites throughout.
- Raspberry ribbon: Dot 1/4 cup seedless raspberry jam on top before swirling for a sweet-tart finish.
- Gluten-free: Use a cup-for-cup gluten-free flour blend. Let the batter rest 10 minutes before baking to hydrate.
- Less dye: Use 1–2 teaspoons gel food coloring or reduce to taste. The flavor won’t change much.
- Citrus twist: Add 1 teaspoon orange zest to the cheesecake mixture for a bright, subtle lift.
- 9-inch pan option: For thinner brownies, use a 9-inch square pan and start checking at 22 minutes.
FAQ
Can I use natural food coloring?
Yes.
Beet-based liquid coloring or powdered beetroot can work, though the shade may be deeper or more muted. The flavor impact is minimal, but you may need a bit more to achieve a bold color.
What if I only have Dutch-process cocoa?
You can use it, but the classic red velvet tang and color come from natural cocoa reacting with acid. If using Dutch-process, keep the vinegar in and consider adding 1/8 teaspoon extra vinegar to help with balance.
How do I know when they’re done?
Look for slightly set edges and a center that still has a gentle jiggle.
A toothpick near the edge should have moist crumbs, not wet batter. Cheesecake on top should look matte, not glossy.
Can I double the recipe?
Yes. Bake in a 9×13-inch pan and extend the bake time to about 32–40 minutes.
Watch the edges and test as you go since ovens vary.
What’s the best way to cut clean slices?
Chill the brownies, then use a sharp knife dipped in hot water and wiped dry between cuts. This prevents drag marks through the cheesecake layer.
Do I need to refrigerate leftovers?
Yes. Because of the cheesecake swirl, store leftovers in the fridge.
They taste great cold and hold their shape better.
Can I reduce the sugar?
You can reduce the sugar in the brownie base to 3/4 cup, but texture may be a little less fudgy and the top less shiny. Keep the cheesecake sugar as written for a smooth set.
Why add both butter and oil?
Butter brings flavor and a tender crumb, while oil helps maintain moisture for that soft, fudgy bite. It’s the best of both worlds.
Final Thoughts
Red velvet cheesecake brownies look impressive, taste luxurious, and come together with simple pantry ingredients.
The swirl alone makes them feel special, and the fudgy-cheesecake combo hits every sweet spot. Keep this recipe on hand for birthdays, potlucks, and cozy nights in. One pan, a few swirls, and you’ve got a dessert people won’t forget.
Printable Recipe Card
Want just the essential recipe details without scrolling through the article? Get our printable recipe card with just the ingredients and instructions.
About the Author

Brandon D
Blogger/Fitness & Wellness Coach
I create quick, healthy, family-friendly recipes that make dinner simple, delicious, and stress-free.