Peppermint Chocolate Cheesecake – A Festive, Creamy Delight
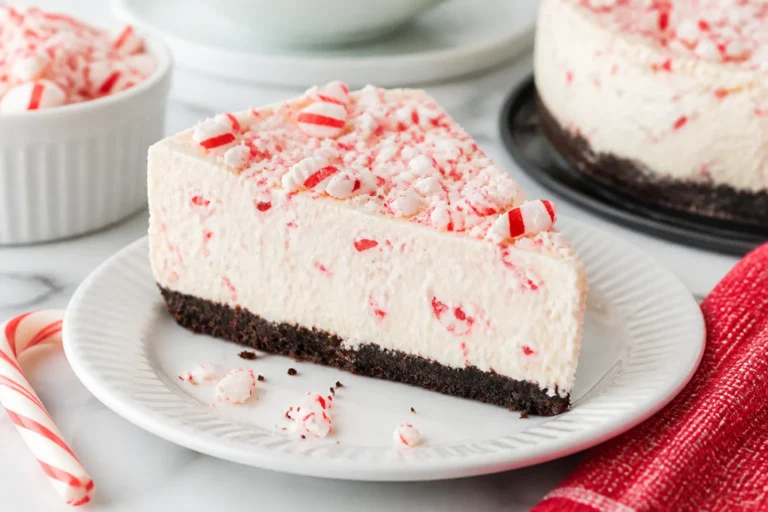
There’s something special about the cool snap of peppermint paired with rich chocolate. This cheesecake brings those flavors together in a smooth, creamy slice that feels both cozy and refreshing. It’s perfect for holidays, winter gatherings, or any time you want a dessert that looks impressive but is surprisingly manageable.
The chocolate cookie crust adds crunch, the filling is silky, and the peppermint finish is bright without being overwhelming. Serve it once, and you’ll be asked for it every year.

Ingredients
Method
- Prep the pan. Wrap the outside of a 9-inch springform pan with two layers of heavy-duty foil, covering the bottom and sides. This keeps water out during baking. Heat the oven to 325°F (163°C).
- Make the crust. Combine cookie crumbs, melted butter, sugar, and a pinch of salt. Press the mixture firmly into the bottom of the pan and slightly up the sides. Bake for 8–10 minutes, then cool while you make the filling.
- Beat the cream cheese. In a large bowl, beat softened cream cheese on medium speed until completely smooth, about 2 minutes. Scrape the bowl well. Smooth cream cheese is key to a silky cheesecake.
- Add sugars and sour cream. Mix in granulated and brown sugar until fluffy. Beat in sour cream and salt until combined. Keep the mixer on low to medium to avoid adding too much air.
- Blend in eggs. Add eggs one at a time, mixing on low just until incorporated. Scrape the bowl after each egg. Do not overmix, or you’ll create bubbles that lead to cracks.
- Flavor and chocolate. Stir in vanilla and peppermint extract. Fold in the melted, slightly cooled chocolate until smooth and uniform. Taste a tiny bit—if you want more mint, add a drop or two, but go slow.
- Assemble the water bath. Pour the filling over the crust. Set the foil-wrapped pan in a large roasting pan. Pour hot water into the roasting pan so it comes halfway up the sides of the springform pan.
- Bake. Bake at 325°F for 55–70 minutes. The edges should be set, and the center should still wobble slightly when gently shaken. Do not overbake.
- Cool gradually. Turn off the oven, crack the door, and let the cheesecake rest inside for 45 minutes. Remove from the water bath, unwrap the foil, and cool on a rack until room temperature.
- Chill. Cover and refrigerate for at least 6 hours, preferably overnight. Chilling sets the texture and deepens the flavor.
- Make the ganache topping. Heat heavy cream until steaming, then pour over chopped chocolate and butter. Let sit 2 minutes, whisk until glossy. Cool slightly, then spread over the chilled cheesecake. Sprinkle with crushed peppermint.
- Serve. Run a warm knife around the edge before unmolding. Slice with a hot, clean knife for neat edges. Serve with whipped cream if you like.
Why This Recipe Works

This peppermint chocolate cheesecake balances bold flavors with a gentle, creamy texture. The chocolate cookie crust provides a sturdy base that won’t crumble when sliced.
A blend of cream cheese and sour cream keeps the filling lush and tangy, while melted chocolate adds body and depth. Peppermint extract is used sparingly for a clean finish that doesn’t taste medicinal. The water bath and slow bake reduce cracks and keep the texture ultra-smooth.
What You’ll Need
- For the crust:
- 24 chocolate wafer cookies or chocolate sandwich cookies (cream removed), finely crushed
- 5 tablespoons unsalted butter, melted
- 2 tablespoons granulated sugar
- Pinch of fine sea salt
- For the filling:
- 24 ounces (3 blocks) cream cheese, softened to room temperature
- 3/4 cup granulated sugar
- 1/4 cup light brown sugar, packed
- 1/2 cup sour cream, room temperature
- 3 large eggs, room temperature
- 8 ounces semi-sweet chocolate, melted and slightly cooled
- 1 teaspoon pure vanilla extract
- 1/2 to 3/4 teaspoon peppermint extract (to taste)
- 1/4 teaspoon fine sea salt
- For the topping (optional but recommended):
- 3/4 cup heavy cream
- 6 ounces semi-sweet chocolate, chopped
- 1 tablespoon unsalted butter
- Crushed peppermint candies or candy canes, for garnish
- Whipped cream, for serving
- Equipment:
- 9-inch springform pan
- Heavy-duty aluminum foil
- Large roasting pan (for water bath)
- Electric mixer (hand or stand)
How to Make It

- Prep the pan. Wrap the outside of a 9-inch springform pan with two layers of heavy-duty foil, covering the bottom and sides.
This keeps water out during baking. Heat the oven to 325°F (163°C).
- Make the crust. Combine cookie crumbs, melted butter, sugar, and a pinch of salt. Press the mixture firmly into the bottom of the pan and slightly up the sides.
Bake for 8–10 minutes, then cool while you make the filling.
- Beat the cream cheese. In a large bowl, beat softened cream cheese on medium speed until completely smooth, about 2 minutes. Scrape the bowl well. Smooth cream cheese is key to a silky cheesecake.
- Add sugars and sour cream. Mix in granulated and brown sugar until fluffy.
Beat in sour cream and salt until combined. Keep the mixer on low to medium to avoid adding too much air.
- Blend in eggs. Add eggs one at a time, mixing on low just until incorporated. Scrape the bowl after each egg. Do not overmix, or you’ll create bubbles that lead to cracks.
- Flavor and chocolate. Stir in vanilla and peppermint extract.
Fold in the melted, slightly cooled chocolate until smooth and uniform. Taste a tiny bit—if you want more mint, add a drop or two, but go slow.
- Assemble the water bath. Pour the filling over the crust. Set the foil-wrapped pan in a large roasting pan.
Pour hot water into the roasting pan so it comes halfway up the sides of the springform pan.
- Bake. Bake at 325°F for 55–70 minutes. The edges should be set, and the center should still wobble slightly when gently shaken. Do not overbake.
- Cool gradually. Turn off the oven, crack the door, and let the cheesecake rest inside for 45 minutes. Remove from the water bath, unwrap the foil, and cool on a rack until room temperature.
- Chill. Cover and refrigerate for at least 6 hours, preferably overnight.
Chilling sets the texture and deepens the flavor.
- Make the ganache topping. Heat heavy cream until steaming, then pour over chopped chocolate and butter. Let sit 2 minutes, whisk until glossy. Cool slightly, then spread over the chilled cheesecake.
Sprinkle with crushed peppermint.
- Serve. Run a warm knife around the edge before unmolding. Slice with a hot, clean knife for neat edges. Serve with whipped cream if you like.
Keeping It Fresh
Cheesecake keeps well if stored properly.
Cover the pan tightly or transfer slices to an airtight container. Refrigerate for up to 5 days. For longer storage, freeze slices on a tray until firm, then wrap tightly and store for up to 2 months. Thaw overnight in the fridge, and add the peppermint garnish just before serving to keep it crisp.

Why This is Good for You
This dessert is a treat, but it still offers a few small perks. Dark chocolate provides antioxidants and a deep, satisfying flavor that can make a smaller slice feel indulgent. Protein from cream cheese and eggs helps the dessert feel more filling, so you don’t need a huge portion.
Peppermint can lend a soothing, cooling sensation that many find refreshing after a rich meal. Enjoy it mindfully, and it fits beautifully into a balanced approach to sweets.
Pitfalls to Watch Out For
- Overmixing the batter: Too much air leads to cracks. Mix on low and scrape the bowl often.
- Skipping the water bath: Dry edges and deep cracks are common without it.
The gentle steam keeps the texture creamy.
- Overbaking: A fully firm center in the oven means a dry cheesecake later. Stop when the center wobbles slightly.
- Too much peppermint extract: It can turn sharp or medicinal fast. Start with 1/2 teaspoon and adjust carefully.
- Cutting too soon: Warm cheesecake won’t slice cleanly and may taste flat.
Chill thoroughly for the best texture and flavor.
Alternatives
- Crust swaps: Use chocolate graham crackers, Oreo crumbs (cream included), or a mixture of chocolate cookies and toasted almonds.
- Chocolate levels: Prefer darker? Use bittersweet chocolate. Want lighter?
Try milk chocolate, but reduce sugar slightly in the filling.
- No-ganache option: Dust with cocoa powder or top with chocolate shavings and crushed peppermint instead.
- Mint variations: Use crushed mint chocolates on top or fold in chocolate-mint chips to the batter for texture.
- Gluten-free: Choose certified gluten-free chocolate cookies for the crust.
- Lighter touch: Swap half the cream cheese for Neufchâtel and use Greek yogurt instead of sour cream, knowing the texture will be slightly less rich.
FAQ
Can I make this cheesecake ahead of time?
Yes. It’s actually better when made a day ahead. Bake, cool, and chill overnight.
Add the ganache and peppermint garnish the day you plan to serve for the best texture and appearance.
How do I prevent cracks without a water bath?
You can bake at a lower temperature and place a pan of hot water on the rack below, then cool slowly in the oven with the door cracked. It helps, but a true water bath gives the most reliable results.
What if my cheesecake cracks anyway?
Don’t stress. Ganache is your best friend here.
Pour it on and spread it gently—cracks disappear, and you get a glossy finish.
Can I use peppermint oil instead of extract?
Yes, but it’s much stronger. Start with 1–2 drops, mix, taste, and adjust carefully. Too much can overwhelm the chocolate.
Do I need to bring ingredients to room temperature?
Absolutely. Room-temperature cream cheese, eggs, and sour cream blend smoothly, preventing lumps and overmixing.
Can I freeze the whole cheesecake?
Yes.
Chill until firm, then freeze uncovered until solid. Wrap tightly in plastic and foil. Thaw overnight in the fridge and add the ganache and peppermint garnish after thawing.
What size pan should I use if I don’t have a 9-inch springform?
An 8-inch springform will yield a taller cheesecake; increase bake time slightly.
A 10-inch will be thinner; reduce time. Watch the wobble rather than the clock.
Can I make mini cheesecakes?
Yes. Use a lined muffin tin with a spoonful of crust per cup, bake the crust for 5 minutes, then add filling.
Bake 16–20 minutes and chill before topping.
In Conclusion
This Peppermint Chocolate Cheesecake hits that sweet spot between rich and refreshing, with a texture that feels bakery-level at home. With careful mixing, a gentle bake, and a touch of peppermint, it’s a dessert that stands out on any table. Keep the steps simple, don’t rush the chill, and you’ll have clean slices and big smiles.
It’s festive, dependable, and absolutely worth a place in your dessert lineup.
Printable Recipe Card
Want just the essential recipe details without scrolling through the article? Get our printable recipe card with just the ingredients and instructions.
About the Author

Brandon D
Blogger/Fitness & Wellness Coach
I create quick, healthy, family-friendly recipes that make dinner simple, delicious, and stress-free.