No Bake Chocolate Coconut Snowballs – A Quick, Cozy Treat
Skip the oven and make a batch of rich, fudgy snowballs that taste like a cross between a brownie bite and a Mounds bar. These No Bake Chocolate Coconut Snowballs come together in minutes with pantry staples, and they look festive without any fuss. They’re sweet but not cloying, soft in the middle, and rolled in a flurry of coconut “snow.” Perfect for holidays, potlucks, or those nights when you just want something chocolaty without baking.
If you can stir, scoop, and roll, you can make these.

Ingredients
Method
- Prep your station. Line a baking sheet with parchment. Pour about 1 cup of shredded coconut into a shallow bowl for rolling. This keeps things tidy and speeds up the process.
- Warm the wet ingredients. In a small saucepan over low heat, gently warm 1/3 cup coconut oil and 1/2 cup nut butter until smooth and pourable. Stir in 1/3 cup maple syrup (or honey) and 1 teaspoon vanilla. Remove from heat. Do not let it simmer; you just want it melted and combined.
- Mix the dry ingredients. In a medium bowl, whisk 1 1/4 cups unsweetened shredded coconut, 1/2 cup cocoa powder, and a generous pinch (1/4 teaspoon) of fine sea salt. If you’re adding espresso powder or zest, whisk it in now.
- Combine. Pour the warm mixture over the dry ingredients and stir until no dry streaks remain. The mixture should be thick, glossy, and scoopable. If it looks crumbly, add 1–2 teaspoons of warm water or a bit more maple syrup to bring it together.
- Chill briefly (optional but helpful). Pop the bowl into the fridge for 10–15 minutes. Slightly firm dough is easier to roll and less sticky.
- Roll into balls. Using a small cookie scoop or a tablespoon, portion the mixture and roll into 1-inch balls between your palms. If your hands get sticky, rub them with a bit of coconut oil.
- Coat in coconut “snow.” Roll each ball in the reserved shredded coconut until fully covered. Press gently so it adheres.
- Add-ins and variations. If using mini chips, chopped nuts, or dried fruit, fold about 1/3 cup into the mixture before rolling. Keep pieces small so the balls hold together.
- Set and serve. Arrange on the lined sheet and chill for 20–30 minutes to firm up. Enjoy straight from the fridge for a truffle-like bite or at room temperature for a softer texture.
What Makes This Special

These treats deliver maximum flavor with minimal effort. Since they’re no-bake, you don’t have to worry about timing, oven hot spots, or overbaking. The texture is lush and truffle-like, thanks to creamy nut butter and shredded coconut.
They hold their shape nicely yet melt on the tongue. Best of all, they’re endlessly flexible—gluten-free by default and easy to make dairy-free or vegan with simple swaps.
Shopping List
- Unsweetened shredded coconut – both for the mixture and for rolling
- Cocoa powder – natural or Dutch-process
- Nut butter – almond, peanut, or cashew; use sunflower seed butter for nut-free
- Maple syrup or honey – your choice of sweetener
- Coconut oil – helps set the texture
- Vanilla extract
- Fine sea salt
- Optional add-ins: mini chocolate chips, chopped nuts, orange zest, espresso powder, dried cherries, or a splash of rum extract
Instructions
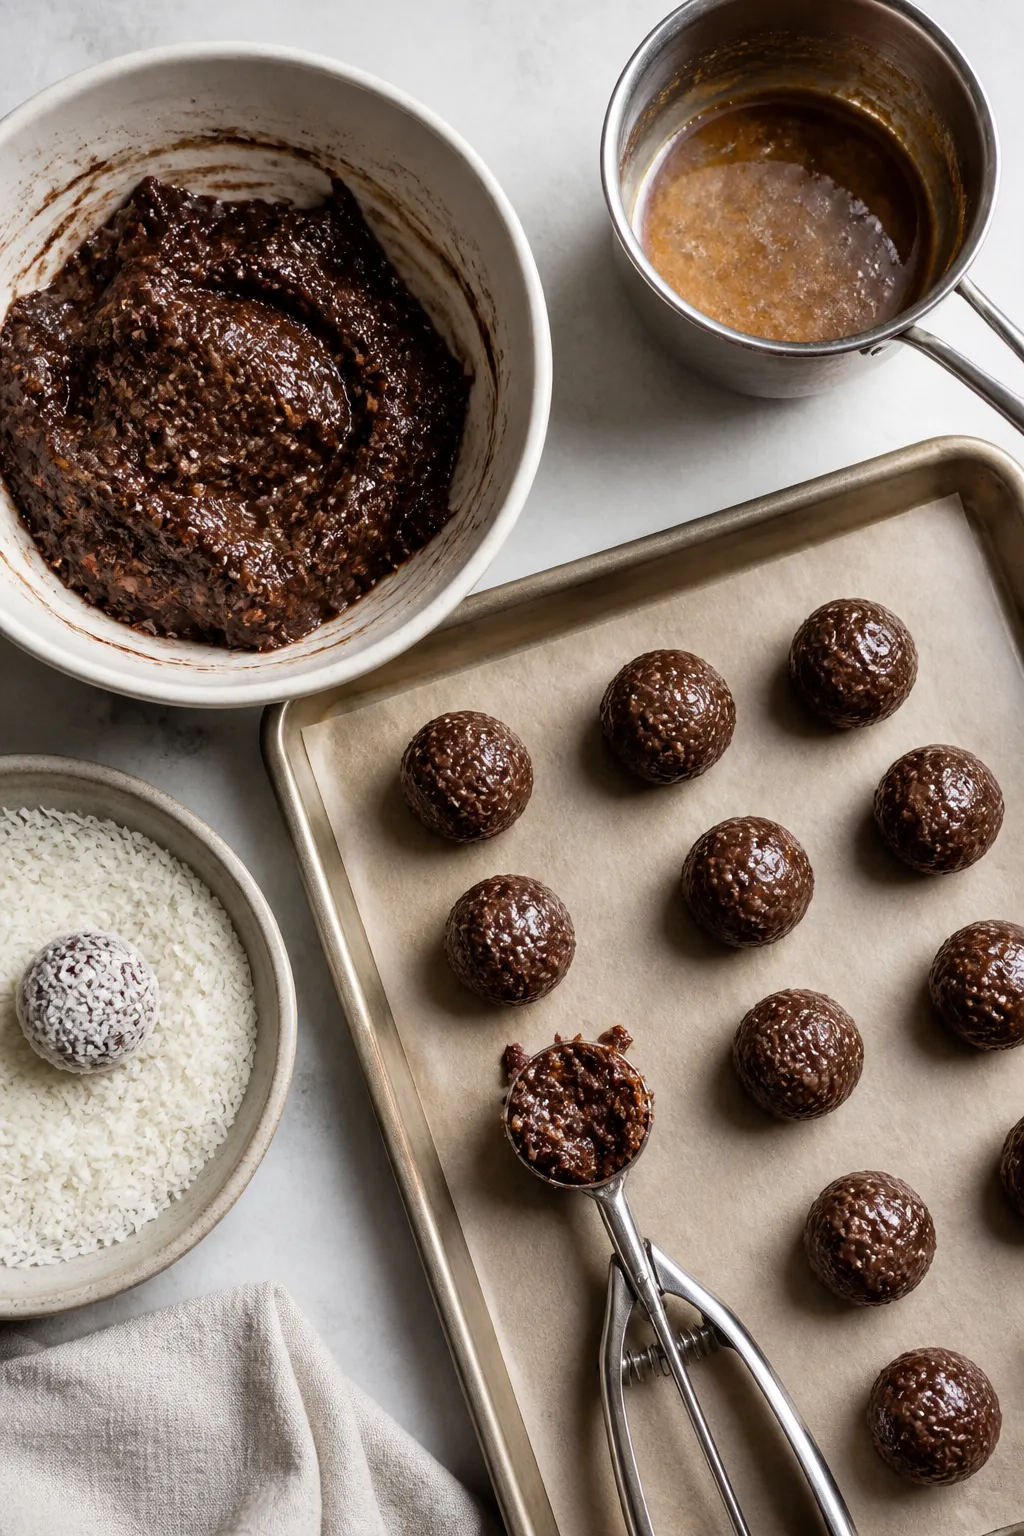
- Prep your station. Line a baking sheet with parchment. Pour about 1 cup of shredded coconut into a shallow bowl for rolling.
This keeps things tidy and speeds up the process.
- Warm the wet ingredients. In a small saucepan over low heat, gently warm 1/3 cup coconut oil and 1/2 cup nut butter until smooth and pourable. Stir in 1/3 cup maple syrup (or honey) and 1 teaspoon vanilla. Remove from heat.
Do not let it simmer; you just want it melted and combined.
- Mix the dry ingredients. In a medium bowl, whisk 1 1/4 cups unsweetened shredded coconut, 1/2 cup cocoa powder, and a generous pinch (1/4 teaspoon) of fine sea salt. If you’re adding espresso powder or zest, whisk it in now.
- Combine. Pour the warm mixture over the dry ingredients and stir until no dry streaks remain. The mixture should be thick, glossy, and scoopable.
If it looks crumbly, add 1–2 teaspoons of warm water or a bit more maple syrup to bring it together.
- Chill briefly (optional but helpful). Pop the bowl into the fridge for 10–15 minutes. Slightly firm dough is easier to roll and less sticky.
- Roll into balls. Using a small cookie scoop or a tablespoon, portion the mixture and roll into 1-inch balls between your palms. If your hands get sticky, rub them with a bit of coconut oil.
- Coat in coconut “snow.” Roll each ball in the reserved shredded coconut until fully covered.
Press gently so it adheres.
- Add-ins and variations. If using mini chips, chopped nuts, or dried fruit, fold about 1/3 cup into the mixture before rolling. Keep pieces small so the balls hold together.
- Set and serve. Arrange on the lined sheet and chill for 20–30 minutes to firm up. Enjoy straight from the fridge for a truffle-like bite or at room temperature for a softer texture.
Keeping It Fresh
These store beautifully, which makes them great for gifting and make-ahead trays.
Keep them in an airtight container in the fridge for up to 10 days. Separate layers with parchment so the coconut coating stays neat. For longer storage, freeze up to 2 months.
Thaw in the fridge for an hour, or on the counter for 10–15 minutes. If the coating looks a bit flattened after thawing, roll lightly in fresh coconut to refresh the “snow.”

Why This is Good for You
These snowballs feel indulgent but offer a few perks. Unsweetened coconut brings fiber and satisfying fats that help with fullness. Nut butter adds protein and more healthy fats, giving a steady energy lift instead of a sugar spike. Cocoa powder supplies antioxidants and deep chocolate flavor without added dairy. Using maple syrup or honey instead of refined sugar keeps the sweetness mellow and the texture chewy.
Portion size matters, but for a dessert bite, this one pulls its weight.
Pitfalls to Watch Out For
- Too dry or crumbly dough: This usually means the coconut absorbed more moisture than expected. Fix it by adding a teaspoon of warm water or a splash of maple syrup until it clumps easily.
- Oily separation: Overheating the coconut oil and nut butter can cause slickness. Warm gently and stir well.
If it gets greasy, whisk in a tablespoon of cocoa to rebalance.
- Coating won’t stick: Roll while the balls are slightly soft. If they’re too cold, let them sit a minute, then press the coconut on with your palms.
- Too sweet or too bitter: Cocoa varies. Taste the mixture before rolling and adjust with extra maple syrup for sweetness or a pinch more salt to bring flavors forward.
- Soft at room temp: In warm kitchens, they can slump.
Add 1–2 tablespoons extra shredded coconut to the mix, or store chilled until serving.
Alternatives
- Nut-free: Swap nut butter for sunflower seed butter or tahini. Taste and adjust sweetness; tahini can be slightly bitter and might need a touch more maple syrup.
- Vegan: Use maple syrup and dairy-free mini chips, if adding.
- Low-sugar: Replace part of the maple syrup with a liquid monk fruit blend. Start with half the amount, then taste and adjust.
Balance with a bit more coconut oil if the texture feels stiff.
- Extra chocolatey: Stir in mini chips and dust finished balls with a whisper of cocoa before rolling in coconut.
- Mocha version: Add 1/2 teaspoon espresso powder to the dry mix and a pinch of cinnamon for warmth.
- Festive flair: Mix in chopped dried cherries or cranberries and a little orange zest. The citrus brightens the chocolate beautifully.
FAQ
Can I use sweetened shredded coconut?
Yes, but reduce the maple syrup or honey slightly, then taste the mixture. Sweetened coconut will make the snowballs noticeably sweeter and a bit chewier.
Which cocoa powder is best?
Both natural and Dutch-process work.
Dutch-process gives a smoother, deeper chocolate flavor; natural cocoa is a bit brighter. Use what you have and adjust sweetness to taste.
Do I need a food processor?
No. A bowl, spoon, and a small saucepan are enough.
If your shredded coconut is very coarse, a quick pulse in a processor can help the mixture bind, but it’s optional.
How do I keep them from sticking to my hands?
Lightly oil your palms with coconut oil or chill the mixture for 10–15 minutes before rolling. A small cookie scoop also helps keep portions tidy.
Can I add protein powder?
Yes. Add 1–2 tablespoons of a neutral or chocolate protein powder and, if needed, a teaspoon or two more maple syrup or water to maintain a pliable texture.
What if I don’t like coconut?
Use finely ground almonds, hazelnuts, or oat flour in the mix, and roll the balls in cocoa powder or finely chopped nuts instead of coconut.
Are these safe to pack in lunches?
They travel well if kept cool.
Pack with an ice pack, especially in warm weather, to keep the coating intact and the centers firm.
Can I make them larger?
Absolutely. For 1.5–2-inch balls, chill longer to help them set, and expect a richer bite. You can also press the mixture into a parchment-lined pan and cut into bars.
Final Thoughts
No Bake Chocolate Coconut Snowballs are simple, flexible, and reliably delicious.
You can whip them up on a weeknight, tuck them into a cookie box, or keep a batch in the freezer for last-minute guests. The ingredient list is short, the method is forgiving, and the flavor payoff is big. Once you make them, they’ll become one of those go-to treats you can count on, any time a chocolate craving hits.
Printable Recipe Card
Want just the essential recipe details without scrolling through the article? Get our printable recipe card with just the ingredients and instructions.
About the Author

Brandon D
Blogger/Fitness & Wellness Coach
I create quick, healthy, family-friendly recipes that make dinner simple, delicious, and stress-free.