Little Debbie Christmas Tree Cake Cookies – A Festive, No-Fuss Treat
If you grew up loving Little Debbie Christmas Tree Cakes, this cookie version will make your inner kid cheer. These cookies capture all the nostalgia—soft, sweet, and sprinkled—without fussy decorating. They’re easy to make, great for holiday parties, and a fun baking project with kids.
The flavor stays true to the beloved snack cake, but you get a handheld cookie with a creamy filling and a gentle crunch from the white coating. They’re cozy, cheerful, and guaranteed to disappear fast.

Ingredients
Method
- Mix the dry ingredients: Whisk flour, baking powder, and salt in a bowl. Set aside.
- Cream butter and sugar: In a large bowl, beat butter and granulated sugar until light and fluffy, about 2–3 minutes.
- Add egg and extracts: Beat in the egg, vanilla, and almond extract until smooth.
- Bring dough together: Add dry ingredients in two additions. If the dough looks dry, mix in milk 1 tablespoon at a time until it holds together but isn’t sticky.
- Chill: Divide dough in half, flatten into discs, wrap, and chill 30–45 minutes. This helps with clean shapes.
- Roll and cut: On lightly floured parchment, roll dough to about 1/4 inch thick. Cut tree shapes and place on a parchment-lined sheet, spacing slightly.
- Re-chill (quick set): Pop the tray into the fridge or freezer for 10 minutes to prevent spreading.
- Bake: Bake at 350°F (175°C) for 8–10 minutes, until edges are just set and centers look dry but pale. Don’t overbake. Cool completely.
- Make the filling: Beat cream cheese and butter until smooth. Mix in powdered sugar and vanilla. Add cream or milk until fluffy and spreadable.
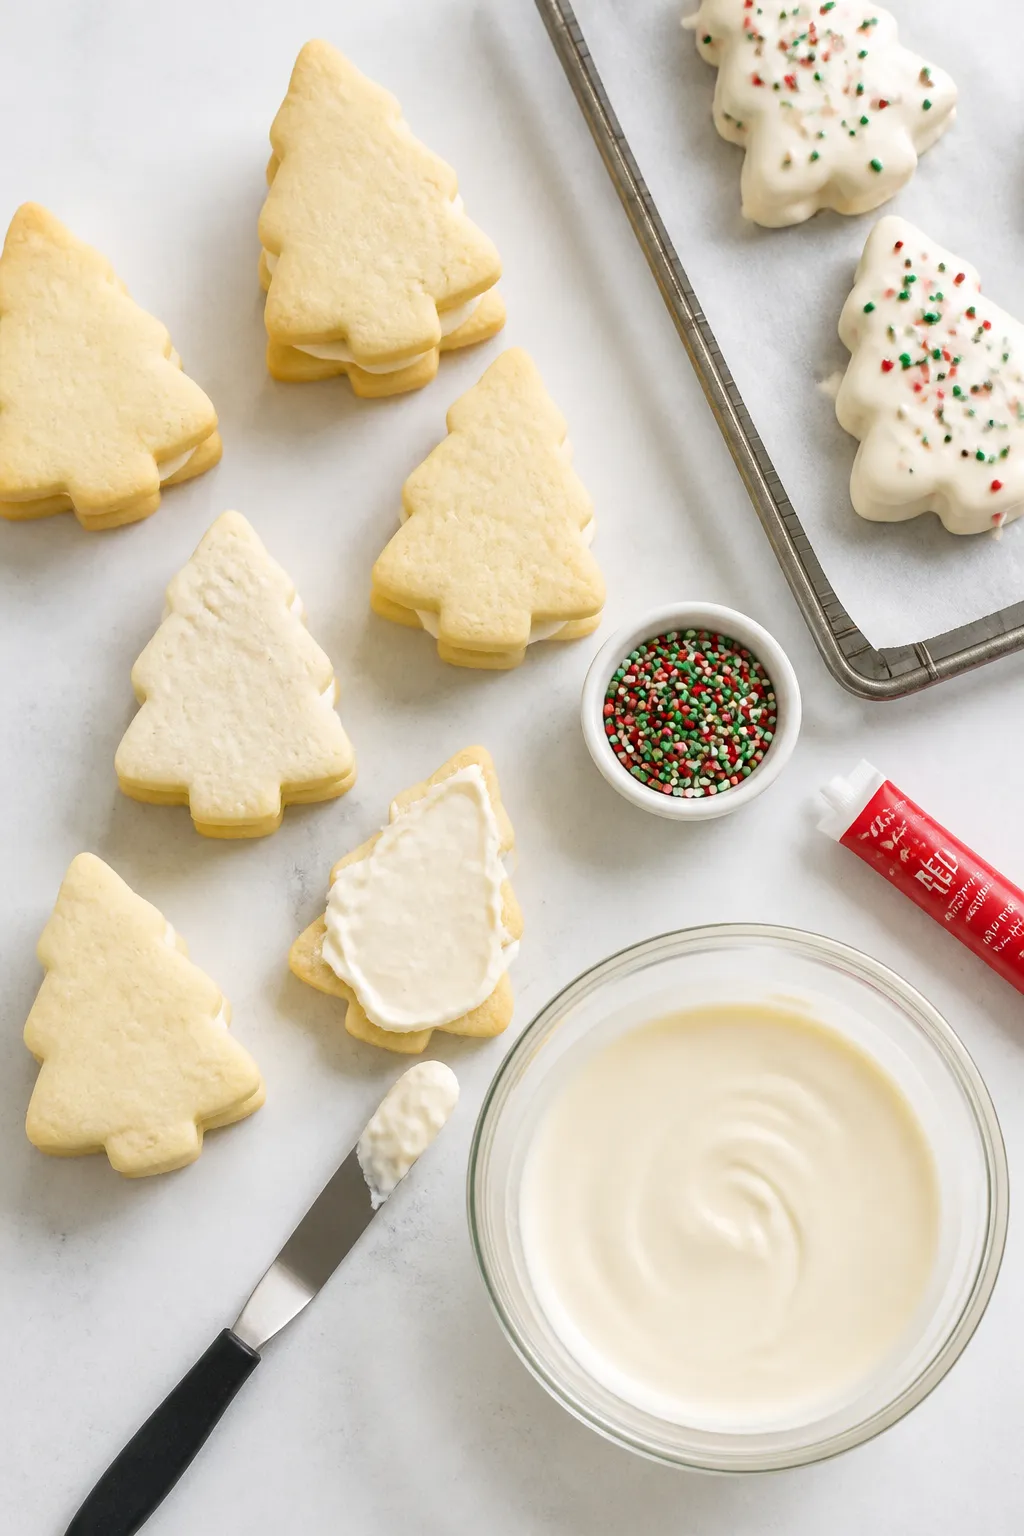
- Assemble sandwiches: Pair cookies by similar size. Spread or pipe a thin layer of filling on one cookie and top with its match. Press gently to seal.
- Melt the coating: In a microwave-safe bowl, heat almond bark or candy melts in 20–30 second bursts, stirring between each, until smooth. Stir in a bit of coconut oil if too thick.
- Dip or coat: Working one cookie at a time, dip the tops or spoon coating over them, letting excess drip off. Set on parchment.
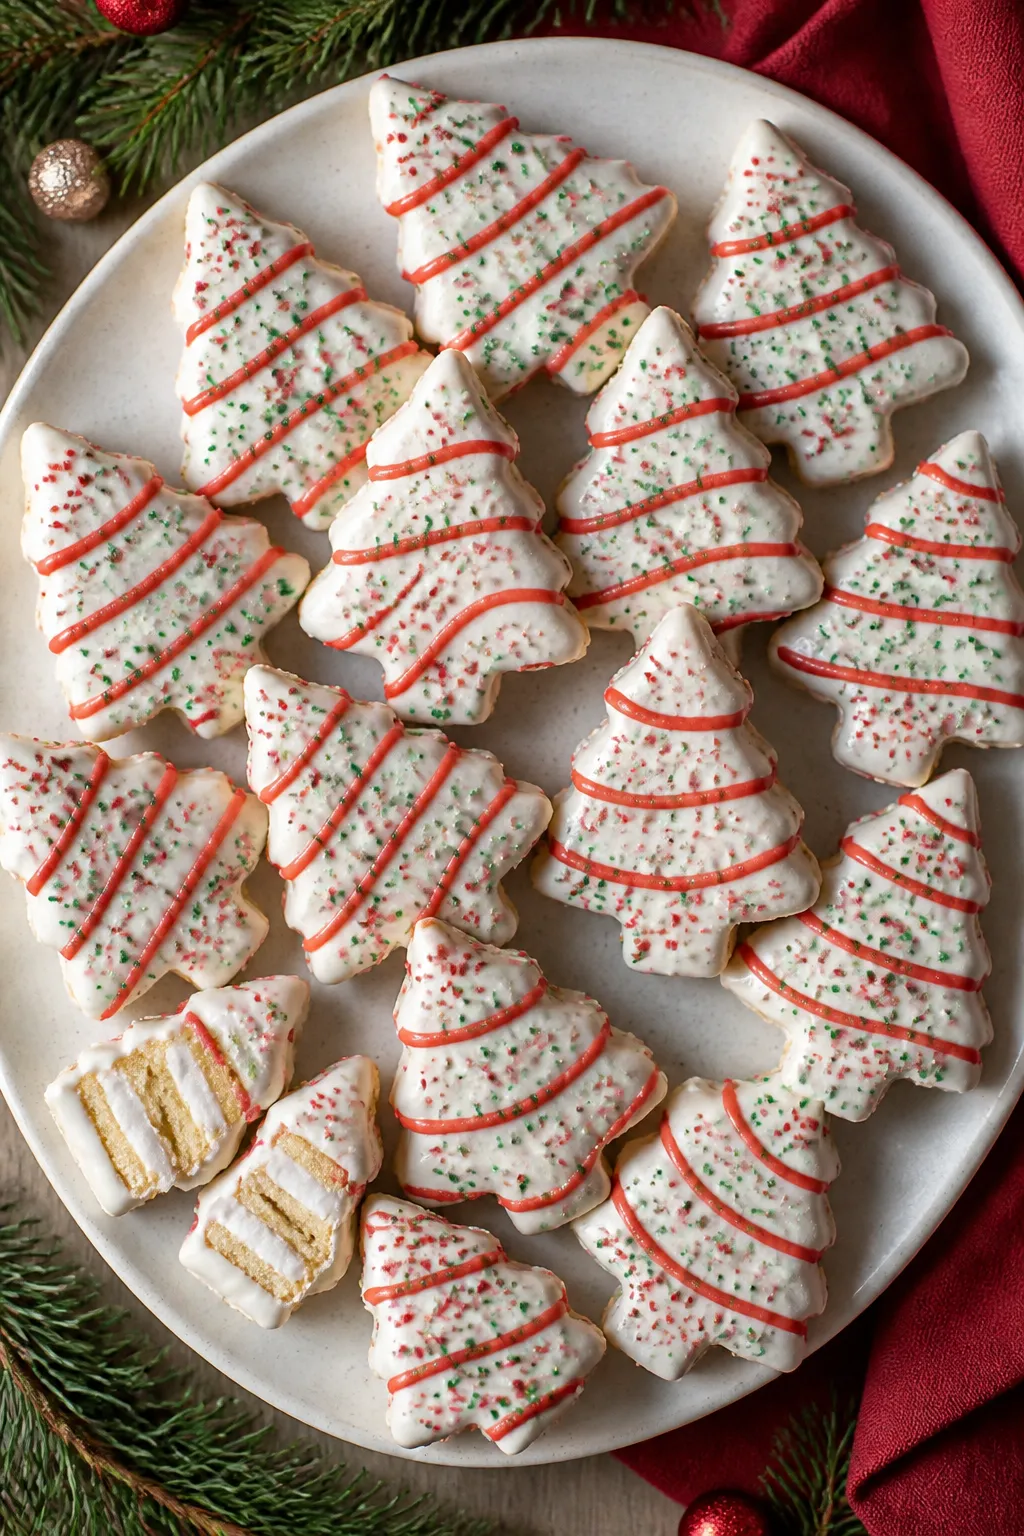
- Decorate: While still wet, add green and red sprinkles. Pipe thin red stripes with gel or melted red candy to mimic the classic look.
- Set and serve: Let coating firm at room temperature or chill for 10–15 minutes. Enjoy once the shell is set.
What Makes This Special
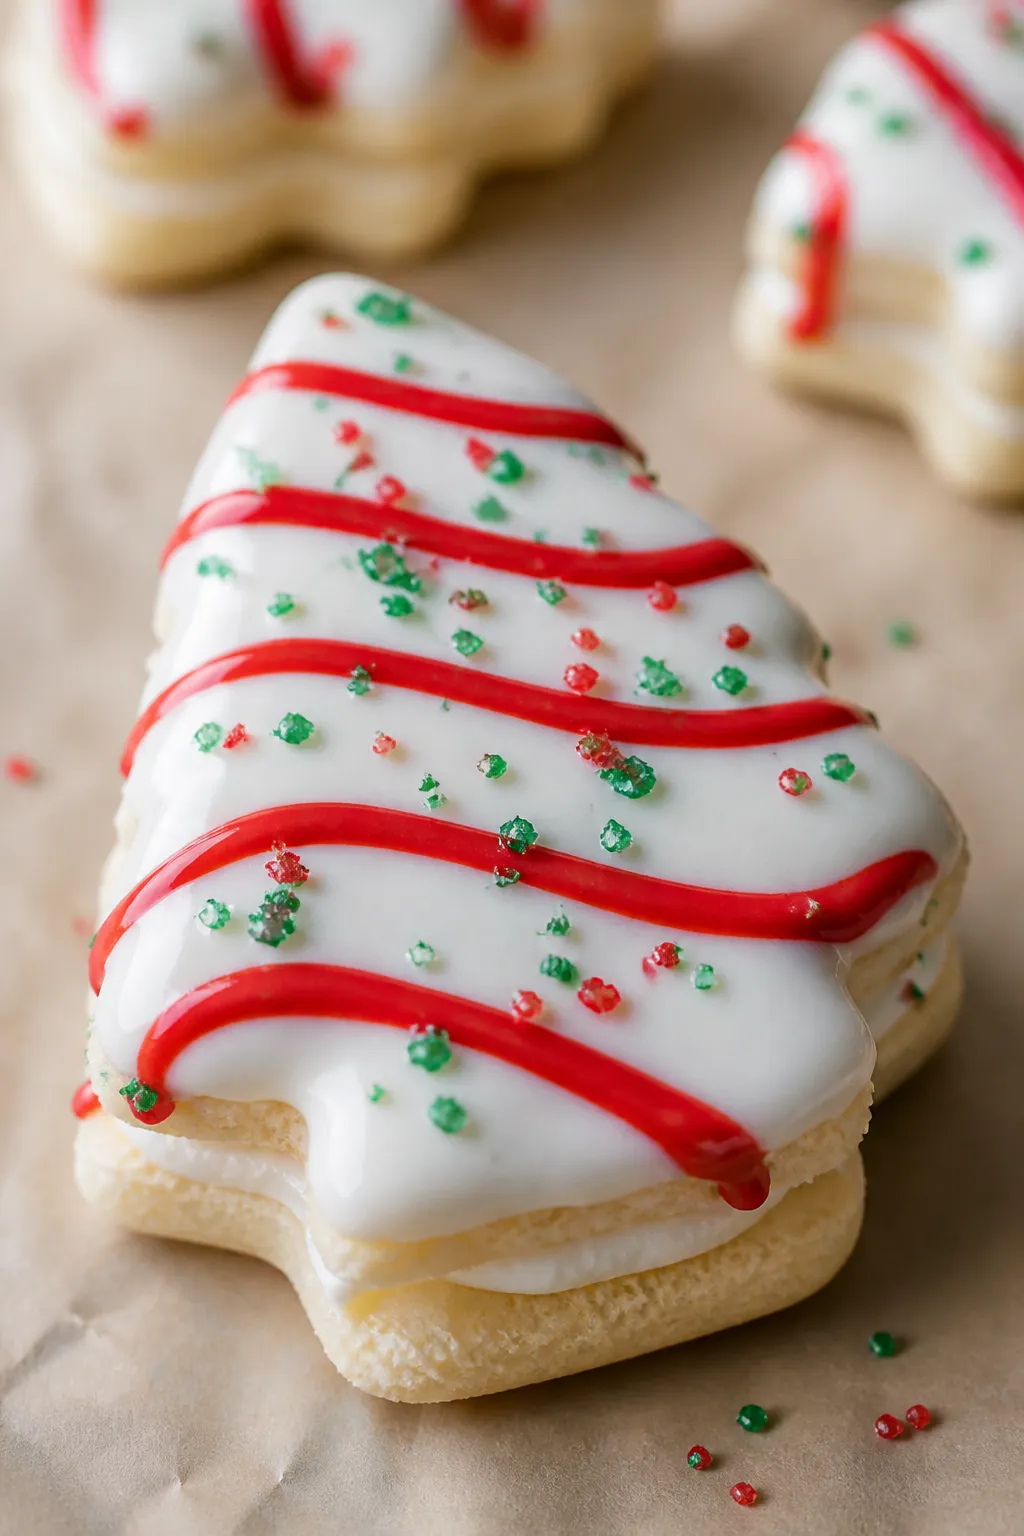
These cookies bring together everything you love about the classic snack cake: soft vanilla flavor, layers of creamy filling, a light crunch from the candy coating, and that signature red and green sprinkle finish. But instead of unwrapping a box, you’ll bake a batch that feels homemade and heartfelt.
- Nostalgic flavor: Vanilla, a hint of almond, creamy filling, and sweet white coating.
- Simple assembly: No complex decorating or piping.
- Festive look: Tree shapes with red gel stripes and sprinkles scream holiday.
- Great for gifting: Sturdy enough to pack, cute enough to impress.
Shopping List
- For the cookies:
- 2 1/2 cups all-purpose flour
- 1/2 teaspoon baking powder
- 1/2 teaspoon kosher salt
- 3/4 cup unsalted butter, softened
- 3/4 cup granulated sugar
- 1 large egg
- 2 teaspoons vanilla extract
- 1/4 teaspoon almond extract (optional but recommended)
- 2–3 tablespoons milk (as needed)
- For the filling:
- 4 ounces cream cheese, softened
- 2 tablespoons unsalted butter, softened
- 1 cup powdered sugar
- 1 teaspoon vanilla extract
- 1–2 tablespoons heavy cream or milk (to loosen)
- For the coating and decoration:
- 12 ounces vanilla almond bark or white candy melts
- 1 tablespoon coconut oil or vegetable shortening (optional, for thinning)
- Red decorating gel or red candy melts
- Green and red sugar sprinkles
- Tools:
- Tree-shaped cookie cutter (about 3–3.5 inches)
- Rolling pin and parchment paper
- Cooling racks
Instructions
- Mix the dry ingredients: Whisk flour, baking powder, and salt in a bowl.
Set aside.
- Cream butter and sugar: In a large bowl, beat butter and granulated sugar until light and fluffy, about 2–3 minutes.
- Add egg and extracts: Beat in the egg, vanilla, and almond extract until smooth.
- Bring dough together: Add dry ingredients in two additions. If the dough looks dry, mix in milk 1 tablespoon at a time until it holds together but isn’t sticky.
- Chill: Divide dough in half, flatten into discs, wrap, and chill 30–45 minutes. This helps with clean shapes.
- Roll and cut: On lightly floured parchment, roll dough to about 1/4 inch thick.
Cut tree shapes and place on a parchment-lined sheet, spacing slightly.
- Re-chill (quick set): Pop the tray into the fridge or freezer for 10 minutes to prevent spreading.
- Bake: Bake at 350°F (175°C) for 8–10 minutes, until edges are just set and centers look dry but pale. Don’t overbake. Cool completely.
- Make the filling: Beat cream cheese and butter until smooth.
Mix in powdered sugar and vanilla. Add cream or milk until fluffy and spreadable.
- Assemble sandwiches: Pair cookies by similar size. Spread or pipe a thin layer of filling on one cookie and top with its match.
Press gently to seal.
- Melt the coating: In a microwave-safe bowl, heat almond bark or candy melts in 20–30 second bursts, stirring between each, until smooth. Stir in a bit of coconut oil if too thick.
- Dip or coat: Working one cookie at a time, dip the tops or spoon coating over them, letting excess drip off. Set on parchment.
- Decorate: While still wet, add green and red sprinkles.
Pipe thin red stripes with gel or melted red candy to mimic the classic look.
- Set and serve: Let coating firm at room temperature or chill for 10–15 minutes. Enjoy once the shell is set.
Keeping It Fresh
- Room temperature: Store in an airtight container for up to 2 days if your kitchen is cool.
- Refrigerator: Because of the cream cheese filling, they keep best in the fridge for 4–5 days. Bring to room temp before serving for the softest bite.
- Freezer: Freeze in a single layer until solid, then move to a container with parchment between layers.
They’ll keep for up to 2 months. Thaw uncovered in the fridge to avoid condensation on the coating.
Health Benefits
These cookies are a treat, not a superfood, but there are still a few small wins. Portion control is built in—each cookie sandwich is satisfyingly sweet, so one goes a long way. Homemade ingredients mean you control the quality and can use less processed coatings or lower-sugar sprinkles if you like. If you need to adjust for dietary preferences, you can opt for gluten-free flour blends or reduced-fat cream cheese without sacrificing much texture.
What Not to Do
- Don’t skip chilling the dough. Warm dough spreads and loses the tree shape.
- Don’t overbake. The cookies should be pale.
Brown edges mean a crisper, less cake-like bite.
- Don’t overfill. Too much filling will ooze under the warm coating.
- Don’t rush the coating. If it’s too thick, it will look clumpy. Thin it slightly for a smoother shell.
- Don’t store while warm. Steam softens the coating and ruins the crunch.
Variations You Can Try
- Chocolate twist: Swap 1/4 cup of the flour for cocoa powder and use chocolate candy melts for coating.
- Peppermint cheer: Add 1/4 teaspoon peppermint extract to the filling and sprinkle crushed peppermint on top.
- Gluten-free: Use a 1:1 gluten-free baking flour with xanthan gum. Chill well for clean cuts.
- Red velvet: Add a few drops of red gel food coloring to the dough and a teaspoon of cocoa for a soft red velvet vibe.
- Kid-friendly minis: Use a smaller cutter for bite-size cookies and reduce bake time by 1–2 minutes.
FAQ
Can I use store-bought sugar cookie dough?
Yes, you can.
Choose a dough that bakes up tender and not too crisp. Chill it well, roll to 1/4 inch thick, and keep an eye on the bake time to avoid browning.
What can I use instead of almond bark?
White candy melts or high-quality white chocolate work. If using real white chocolate, melt gently and add a touch of coconut oil to improve flow and set.
Do I need a tree-shaped cutter?
No, but it helps with the classic look.
Stars or simple rounds still taste great and are easier to cut and coat.
How do I keep the coating from cracking?
Let the cookies sit at room temperature after chilling before dipping. Big temperature swings cause cracks. Also, don’t make the coating too thin.
Can I make them ahead?
Yes.
Bake and assemble the cookie sandwiches a day ahead, then coat and decorate the day you plan to serve for the cleanest finish.
Is there a dairy-free option?
Use dairy-free butter, a vegan cream cheese for the filling, and dairy-free white baking chips. The texture will still be soft and the flavor sweet and festive.
In Conclusion
Little Debbie Christmas Tree Cake Cookies deliver the magic of a holiday favorite in a homemade, giftable package. They’re easy to assemble, fun to decorate, and nostalgic in the best way.
Keep a batch on hand for parties, cookie trays, or cozy nights in—you’ll taste the holidays in every bite.
Printable Recipe Card
Want just the essential recipe details without scrolling through the article? Get our printable recipe card with just the ingredients and instructions.
About the Author

Brandon D
Blogger/Fitness & Wellness Coach
I create quick, healthy, family-friendly recipes that make dinner simple, delicious, and stress-free.