Chocolate Peppermint Crinkle Cookies – Festive, Fudgy, and Easy
Chocolate peppermint crinkle cookies taste like a cozy winter night wrapped in a cookie. They’re soft and fudgy in the center, lightly crisp at the edges, and dusted with a snowy crackle of powdered sugar. The hint of peppermint brightens the deep cocoa flavor without overpowering it.
They look impressive on a holiday cookie plate, yet they’re simple enough for a weekday bake. If you love chocolate and a touch of mint, this is your cookie.

Ingredients
Method
- Prep your tools. Line two baking sheets with parchment paper. Set out two shallow bowls—one for powdered sugar and one for crushed peppermint (if using).
- Mix the dry ingredients. In a bowl, whisk flour, cocoa, baking powder, and salt until evenly combined. This prevents pockets of cocoa or leavener.
- Cream the butter and sugars. In a large bowl, beat butter, granulated sugar, and brown sugar until light and fluffy, about 2–3 minutes. Proper creaming helps create that soft, crackly texture.
- Add eggs and flavorings. Beat in eggs one at a time, then mix in vanilla and peppermint extract. Start with 1/2 teaspoon peppermint; you can go up to 3/4 teaspoon if you like a stronger mint note.
- Stir in melted chocolate and milk. Beat in the cooled melted chocolate and milk (or coffee) until smooth and glossy. The batter will look like brownie batter—rich and thick.
- Combine wet and dry. Add the dry ingredients in two additions, mixing on low until just combined. If using mini chips, fold them in now. Do not overmix.
- Chill the dough. Cover and refrigerate for at least 1 hour, preferably 2. The dough should be firm enough to scoop and roll without sticking.
- Preheat and portion. Heat the oven to 350°F (175°C). Scoop dough into 1 1/2 tablespoon mounds (a small cookie scoop works great) and roll into balls with your hands.
- Coat generously. Roll each ball in powdered sugar until thickly coated. For a festive twist, gently press one side into crushed peppermint candies, or sprinkle on top after rolling in sugar.
- Bake to just-set. Arrange on the baking sheets, spacing 2 inches apart. Bake 10–12 minutes, until the tops are cracked and the edges are just set. The centers should look slightly soft.
- Cool on the sheet. Let cookies rest on the baking sheet for 5 minutes before transferring to a wire rack. They’ll firm up as they cool while staying fudgy inside.
- Finish and enjoy. If desired, dust with a touch more powdered sugar after cooling. Serve with hot cocoa or coffee.
Why This Recipe Works
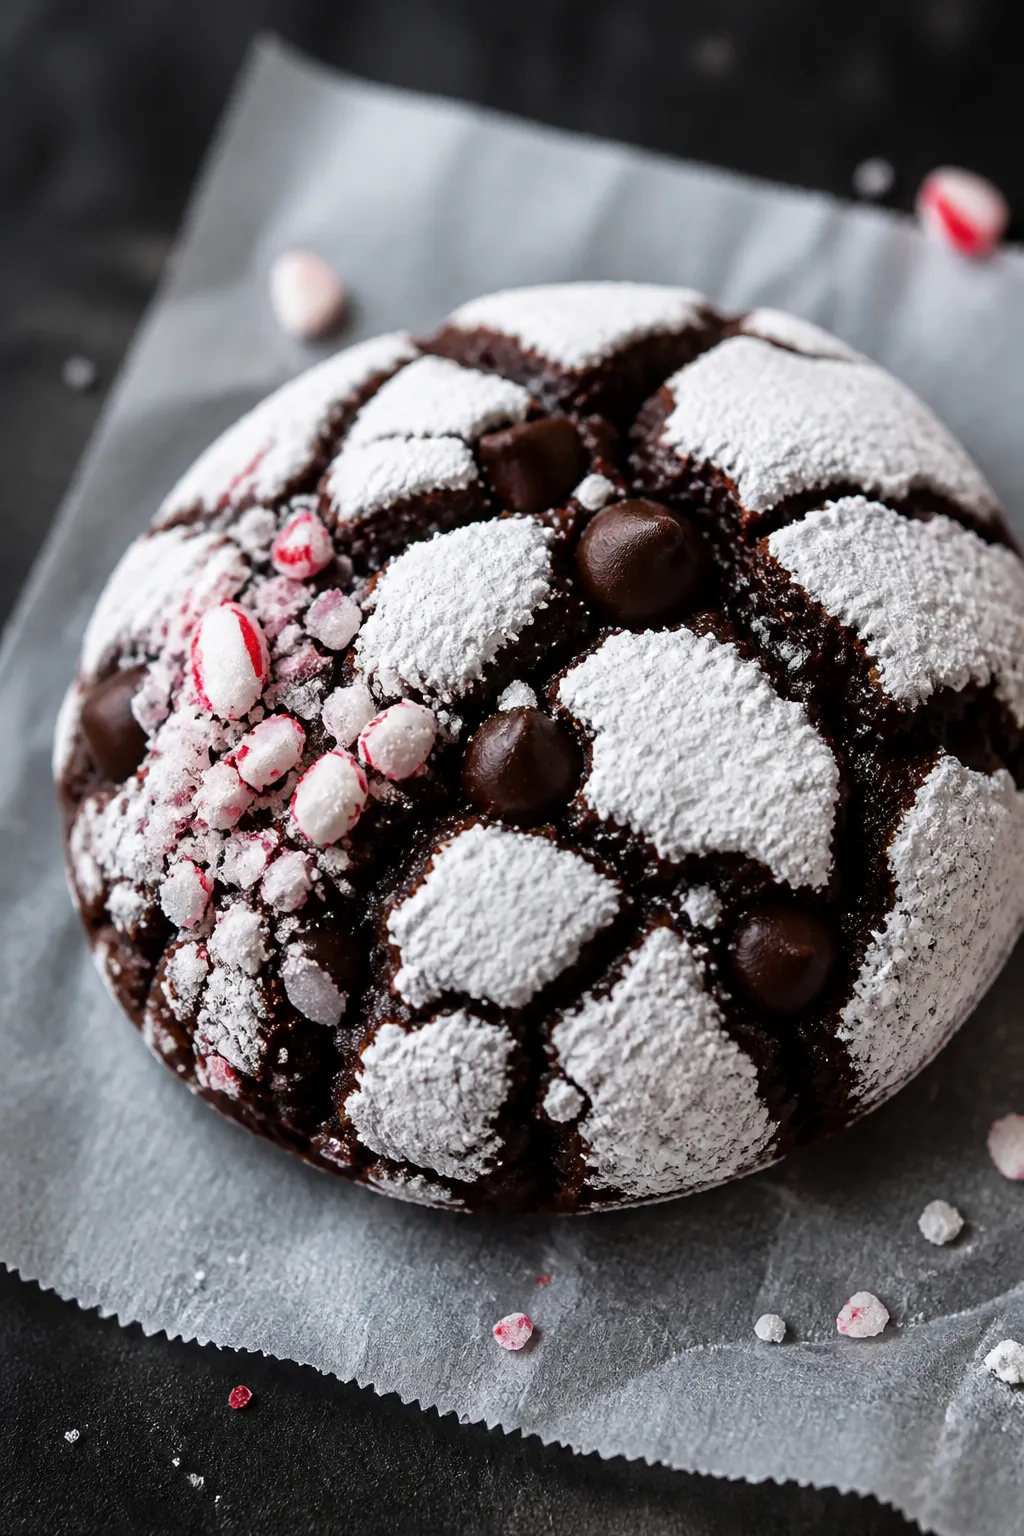
These cookies get their signature crackled top from a thick coating of powdered sugar that splits as the dough rises in the oven. A mix of cocoa powder and melted chocolate builds deep, brownie-like flavor and a moist, tender crumb.
Chilling the dough firms it up so it rolls neatly and bakes with clean crinkles. A small dose of peppermint extract adds freshness without tasting like toothpaste. The result is a cookie that’s soft and fudgy inside, crinkly outside, and perfectly balanced.
Shopping List
- All-purpose flour (1 1/2 cups)
- Unsweetened cocoa powder (1/2 cup)
- Baking powder (1 1/2 teaspoons)
- Fine salt (1/2 teaspoon)
- Granulated sugar (1 cup)
- Brown sugar (1/2 cup, packed)
- Unsalted butter (1/2 cup, softened)
- Large eggs (2)
- Pure vanilla extract (1 teaspoon)
- Peppermint extract (1/2 teaspoon; adjust to taste)
- Bittersweet or semisweet chocolate (4 ounces, melted and slightly cooled)
- Milk (2 tablespoons) or brewed coffee for deeper flavor
- Powdered sugar (about 1 cup, for rolling)
- Crushed peppermint candies or candy canes (optional, 1/3 cup for rolling or sprinkling)
- Mini chocolate chips (optional, 1/2 cup for extra chocolate pockets)
How to Make It

- Prep your tools. Line two baking sheets with parchment paper.
Set out two shallow bowls—one for powdered sugar and one for crushed peppermint (if using).
- Mix the dry ingredients. In a bowl, whisk flour, cocoa, baking powder, and salt until evenly combined. This prevents pockets of cocoa or leavener.
- Cream the butter and sugars. In a large bowl, beat butter, granulated sugar, and brown sugar until light and fluffy, about 2–3 minutes. Proper creaming helps create that soft, crackly texture.
- Add eggs and flavorings. Beat in eggs one at a time, then mix in vanilla and peppermint extract.
Start with 1/2 teaspoon peppermint; you can go up to 3/4 teaspoon if you like a stronger mint note.
- Stir in melted chocolate and milk. Beat in the cooled melted chocolate and milk (or coffee) until smooth and glossy. The batter will look like brownie batter—rich and thick.
- Combine wet and dry. Add the dry ingredients in two additions, mixing on low until just combined. If using mini chips, fold them in now.
Do not overmix.
- Chill the dough. Cover and refrigerate for at least 1 hour, preferably 2. The dough should be firm enough to scoop and roll without sticking.
- Preheat and portion. Heat the oven to 350°F (175°C). Scoop dough into 1 1/2 tablespoon mounds (a small cookie scoop works great) and roll into balls with your hands.
- Coat generously. Roll each ball in powdered sugar until thickly coated.
For a festive twist, gently press one side into crushed peppermint candies, or sprinkle on top after rolling in sugar.
- Bake to just-set. Arrange on the baking sheets, spacing 2 inches apart. Bake 10–12 minutes, until the tops are cracked and the edges are just set. The centers should look slightly soft.
- Cool on the sheet. Let cookies rest on the baking sheet for 5 minutes before transferring to a wire rack.
They’ll firm up as they cool while staying fudgy inside.
- Finish and enjoy. If desired, dust with a touch more powdered sugar after cooling. Serve with hot cocoa or coffee.
Storage Instructions
Keep cookies in an airtight container at room temperature for 3–4 days. To keep them soft, add a slice of bread or a tortilla to the container; replace it if it dries out.
For longer storage, freeze baked cookies for up to 2 months. Thaw at room temperature and refresh with a light dusting of powdered sugar if needed. You can also freeze the unbaked dough balls (already coated in powdered sugar) and bake from frozen, adding 1–2 extra minutes.

Why This is Good for You
These cookies are a treat, but they still offer a few small wins. Cocoa contains flavonoids, which have antioxidant properties.
A modest dose of peppermint can feel soothing and brighten your senses. Making cookies at home also lets you control sweetness and portion size. Sharing them spreads joy, which is good for the soul.
What Not to Do
- Don’t skip chilling. Warm dough spreads too much and won’t crinkle properly.
- Don’t undercoat with powdered sugar. A thin dusting disappears.
Coat generously for bold, snowy cracks.
- Don’t overbake. If you wait for dry centers, you’ll lose the fudgy texture. Pull them when the centers still look soft.
- Don’t overload the peppermint extract. Too much can taste medicinal. Start small and adjust next batch if needed.
- Don’t mix hot chocolate into the batter. Melted chocolate should be warm, not hot, or it can scramble the eggs and seize.
Variations You Can Try
- Double Chocolate Crinkles: Fold in mini chocolate chips or chopped chocolate for melty pockets.
- Mocha Mint: Replace milk with strong brewed coffee and add a pinch of espresso powder.
- White Chocolate Peppermint: Swap mini chips for white chocolate chips and top with crushed candy canes.
- Gluten-Free: Use a 1:1 gluten-free all-purpose blend with xanthan gum.
Chill time may need an extra 30 minutes.
- Dairy-Free: Use plant-based butter sticks and dairy-free chocolate; swap milk for almond or oat milk.
- Orange-Mint Twist: Add 1 teaspoon orange zest and reduce peppermint extract to 1/4 teaspoon.
- Spicy Hot Cocoa: Add 1/8 teaspoon cayenne and 1/2 teaspoon cinnamon for gentle heat.
FAQ
Can I make the dough ahead of time?
Yes. Chill the dough up to 48 hours before baking. If it gets very firm, let it sit at room temperature for 10–15 minutes so it’s easier to scoop and roll.
Why didn’t my cookies crackle?
Usually the dough was too warm, the oven wasn’t hot enough, or there wasn’t enough powdered sugar.
Chill thoroughly, preheat fully, and coat generously for strong crinkles.
How strong should the peppermint flavor be?
It should be present but not sharp. Start with 1/2 teaspoon, especially if you’re adding crushed peppermint on top. Taste a baked test cookie, then adjust next time.
Can I use peppermint oil instead of extract?
Yes, but it’s much stronger.
Use about 1/8 teaspoon to start. Add sparingly—a little goes a long way.
What kind of cocoa powder works best?
Natural unsweetened cocoa works well here and delivers a classic chocolate flavor. Dutch-process also works, giving a smoother, darker taste.
Use what you like and have on hand.
Do I need both granulated and brown sugar?
Using both adds balance. Granulated sugar helps the crackle and lift, while brown sugar adds moisture and a subtle caramel note that keeps the centers soft.
How do I keep the powdered sugar from melting into the dough?
Roll cookies in powdered sugar right before baking and be generous. Some bakers roll first in a little granulated sugar, then powdered sugar—the double coat helps preserve the snowy look.
Can I make them larger or smaller?
Yes.
For smaller cookies, bake 8–9 minutes. For larger 2-tablespoon scoops, bake 12–13 minutes. Always look for cracked tops and soft centers.
Why add melted chocolate if there’s cocoa in the dough?
Melted chocolate brings fat and cocoa solids that deepen flavor and add fudgy texture.
Cocoa alone can taste drier. The combo gives you the best of both worlds.
How do I freeze the dough balls?
Scoop and roll the dough into balls, then freeze on a sheet until solid. Transfer to a freezer bag for up to 2 months.
Roll in powdered sugar right before baking, or freeze already coated and bake straight from frozen.
Wrapping Up
Chocolate peppermint crinkle cookies are a low-effort, high-reward bake that feels instantly festive. With a few simple steps and a good chill, you’ll get rich chocolate flavor, a fresh mint finish, and those iconic snowy cracks. Keep a batch on hand for gifting, parties, or a cold evening treat.
Once you try them, they might become your new holiday standard—though they’re too good to save for just once a year.
Printable Recipe Card
Want just the essential recipe details without scrolling through the article? Get our printable recipe card with just the ingredients and instructions.
About the Author

Brandon D
Blogger/Fitness & Wellness Coach
I create quick, healthy, family-friendly recipes that make dinner simple, delicious, and stress-free.